I've been thinking about starting a bread starter for a few days. I've done this one several times over the years. It's in my binder of recipes.. a 3-ring binder with sleeves where I keep the recipes that I've gotten from my Mom and Grandmothers, and others that are favorites. Nice to know they're all in one place!
The last one I made was neglected during the move from our apartment to the house we live in now. Hopefully this one will be well cared for! : -)
What you'll need:
1 cup flour
1 cup sugar
1 cup milk
Mix all of the ingredients together in a glass or plastic container. Do not refrigerate. Keep securely covered at room temperature from Day 1 through Day 10.
Day 1: Make (or receive if you are getting a starter from a friend) Starter.
Day 2: Stir and cover - Make sure you DO NOT use a metal utensil to stir it with.
Day 3: Stir
Day 4: Stir
Day 5: Add 1 cup each of flour, sugar and milk.
Day 6: Stir
Day 7: Stir
Day 8: Let stand - do not stir
Day 9: Let stand - do not stir
Day 10: Let the fun begin! Make the Friendship Bread (recipe to follow); do not stir or disturb the starter until making the bread.
Starter can be used to make approximately 4 cups of new starter. On Day 10, you can make 4 batches of Frienship Bread or make one batch of bread and give three 1-cup starters to friends (or 2 and 2, or 3 and 1). :-)
Recipe for Friendship Bread:
Cinnamon
Sugar
1 cup oil
3 large eggs
1/2 cup milk
1 tsp. vanilla
2 cups flour
1 cup sugar
1 1/2 tsp. baking powder
1/2 tsp. salt
1/2 tsp. baking soda
2 tsp. cinnamon
1 large box instant vanilla pudding (or any other flavor of your choosing)
1 cup baking raisins (or soak raisins for 5 minutes in hot water and then drain)
1 cup flour
1 cup sugar
1 cup milk
Note: There are a lot of repeats on the ingredients list, but some of those are for when you feed your starter after making the bread
Preheat oven to 325 degrees. In a small bowl, make a mixture of cinnamon and sugar. Prepare two loaf pans, one bundt pan, or a 9 x 13 baking dish by greasing the pans and coating with the cinnamon-sugar mixture, reserving some for topping. Set aside.
Combine oil, eggs, 1/2 cup milk and vanilla in a large glass or non-metal bowl, mixing well. Add 2 cups flour, 1 cup sugar, baking powder, salt, baking soda, cinnamon, pudding and raisins to egg mixture; do not mix.
In a separate medium glass or non-metal bowl, using a wooden spoon, mix together 1 cup flour and 1 cup sugar. Gradually add 1 cup milk, keeping mixture smooth. Add Amish Friendship Bread Starter from container, mixing in gently with wooden spoon. Add approximately 1 cup of the resulting mixture into the egg/flour/raisin mixture. With a wooden spoon, mix egg/flour/raisin starter mixture together well.
Pour batter into the prepared pans; sprinkle reserved cinnamon-sugar mixture on top. Bake at 325 for approximately 1 hour, or until toothpick inserted in center comes out clean. Do not overbake. Allow to cool in pans. This bread freezes well.
Of the remaining new starter mixture, put i cup each into three plastic or glass containers. Keep one starter for yourself and give two starters to friends with the instructions for Amish Friendship Bread Starter (today is Day 1), or make additional batches of the Friendship Bread to keep and eat or freeze, or to give away.
One batch makes 2 loaf pans, one bundt pan, or one 9 x 13 cake pan.
Variations:
Add chopped nuts, dates or chocolate chips to the batter before baking
I am starting my starter tonight. I figure I will be more apt to remember to stir it after I get home from work. Rushing around in the morning, getting the kids ready for school/daycare, isn't the ideal time for me to remember much of anything! I will add photos to this post as it progresses, and after I successfully make it to Day 10 and make the Bread.
Good luck, and enjoy! : -)
~ Thanks for stopping by! ~
Jaime
Tuesday, March 29, 2011
Hoo Are You?
This is my first time joining in on the fun of

1. What is your favorite magazine?
I don't read magazines that often(if I have the time to read, I prefer to whittle away at my pile of books), but when I do, it's usually People.
2. What color are your eyes?
Hazel, with a touch of gold/brown in the center.
3. Do you go to the Dentist on a regular 6 month schedule, or do you put it off?
Do I have to answer this? I don't always stick to the 6 month schedule. Things come up, appointments are moved... Excuses, excuses. :-)
4. Do you use anything to make your house smell good? ex: candles, spray, etc...
I am in love with Scentsy! I have a plug-in in the kids bathroom(HUGE help there), a warmer in my bathroom, and my new Autism warmer in the kitchen. So many yummy scents. :-)
5. Do you have any pets?
Yes, I have one dog, a mini schnauzer named Baxter.
Monday, March 28, 2011
I'm Dyeing Here
This is something I've wanted to try for awhile now, and finally had time to do it Saturday morning. In a perfect world, I would have posted this tutorial Saturday night or Sunday afternoon, but life, and then the flu, got in the way. Thankfully Baby Girl is feeling much better, and Mama is only feeling a little icky. Bugaboo hasn't caught it, and I hope it stays that way!
Okay, on to the fun stuff. I bought some onesies for my niece, and wanted to add some applique to them, so they wouldn't look quite so, well, WHITE. I was in Hobby Lobby, and saw the Rit dye, and thought (it can be a little scary when I start thinking), that would be a great way to make it look really different! Soooooo, this is what I came up with.
Materials Needed:
Rit Dye (there are lots of colors to choose from)
Onesies
Salt
Hot water and a sink
Something to stir with
Rubber Gloves
Washing Machine & Dryer
Time (at least 30 minutes)
Okay, the directions on the bottle of dye said to use the whole bottle for 3 pounds of dry fabric. Well, I'm not sure how much 2 onesies weigh, but I know it's not close to 3 pounds. So, I guessed on how much dye to add to the water, and was very pleased with the results.
You don't need to wash the onesies before dyeing them, because you'll do that after.
First, fill your sink with hot water. I did 2 onesies at a time, and added 12 cups of hot water. Next, add 3/4 to 1 cup of salt, and stir. Then, I added 1/8 cup of dye (I used the color violet for the first 2 onesies), and stir that as well. Make sure that what you choose to use as a stirrer is something you don't mind getting stained. I used a wooden spoon, and it is now forever banned from cooking use, but should have a long and happy life as a crafting stick. : -)
Get your onesies wet before adding them to the dye bath. Then, put them in the sink, and start stirring. The directions on the bottle say to stir constantly for 30 to 60 minutes. Well, in Mommy Land, that isn't always possible. There were a few times I had to leave my stirring duties, but it still turned out fine.
I chose to go with the lesser time. 30 minutes, and I was done stirring.
Now it's time to rinse. Run warm water over the onesies until the water runs clear. I used gloves for this part.
Now it's time to wash them in the washing machine. I washed them with warm water (even though I am a die hard cold water clothes washer).
After washing, I dried it on the highest setting. I wanted to make sure it was done with all of it's shrinking before adding any applique and sending it to my niece.
I did the other 2 onesies in a teal color.
I will be posting a tutorial on adding applique in the next few days. Looking forward to seeing how they turn out, and hopefully my niece (she's almost 10 months old) will approve. : -)
~ Thanks for stopping by! ~
Jaime
I am linking up this project at these great linky parties... Every Crafty Endeavor, Keeping It Simple, The Girl Creative, Sarahndipities, Until Wednesday Calls and....

Okay, on to the fun stuff. I bought some onesies for my niece, and wanted to add some applique to them, so they wouldn't look quite so, well, WHITE. I was in Hobby Lobby, and saw the Rit dye, and thought (it can be a little scary when I start thinking), that would be a great way to make it look really different! Soooooo, this is what I came up with.
Materials Needed:
Rit Dye (there are lots of colors to choose from)
Onesies
Salt
Hot water and a sink
Something to stir with
Rubber Gloves
Washing Machine & Dryer
Time (at least 30 minutes)
 |
| I feel like my Grandmother at Christmas time...just noticed I left the price tags on the bottles of dye. |
 |
| When I got to the checkout, the lady pointed out the price tag on the Apple Green bottle of dye. Thank goodness it was a typo. : -) |
You don't need to wash the onesies before dyeing them, because you'll do that after.
First, fill your sink with hot water. I did 2 onesies at a time, and added 12 cups of hot water. Next, add 3/4 to 1 cup of salt, and stir. Then, I added 1/8 cup of dye (I used the color violet for the first 2 onesies), and stir that as well. Make sure that what you choose to use as a stirrer is something you don't mind getting stained. I used a wooden spoon, and it is now forever banned from cooking use, but should have a long and happy life as a crafting stick. : -)
Get your onesies wet before adding them to the dye bath. Then, put them in the sink, and start stirring. The directions on the bottle say to stir constantly for 30 to 60 minutes. Well, in Mommy Land, that isn't always possible. There were a few times I had to leave my stirring duties, but it still turned out fine.
 |
| I think at this point, I was already clock watching....7 minutes down, 23 to go. |
 |
| Looks goooood. |
 |
| Loving the color! |
 |
| What it looks like before going in the washing machine. Much more exciting than a white onesie. |
 |
| All done! Woohoo! |
 |
| Teal dye bath. |
 |
| Ready to go in the washing machine. |
 |
All done! Very happy with how they turned out. |
~ Thanks for stopping by! ~
Jaime
I am linking up this project at these great linky parties... Every Crafty Endeavor, Keeping It Simple, The Girl Creative, Sarahndipities, Until Wednesday Calls and....
Friday, March 25, 2011
Fundraiser for Austin
Just a reminder, the Fundraiser for Austin, a precious little 3 year old boy that needs a kidney transplant, is still going on over at Crystal's Craft Spot. It ends on Sunday, and there are 6 great giveaway's that you can enter. For every two dollars donated, you get 1 entry into the giveaway of your choice. I have a few items in this giveaway. Soooo many great items in all of the giveaways! Please take the time to look at them. It's for a great cause, and an added bonus that you may end up winning a great prize package.
I hope y'all are having a wonderful day!
~Thanks for stopping by ~
Jaime
I hope y'all are having a wonderful day!
~Thanks for stopping by ~
Jaime
Thursday, March 17, 2011
What's For Supper? Turkey Chili & Corn Bread
Quick & Easy. Two words that always get a Mama excited when it comes to Supper. When I get home from work, somedays, the last thing I want to do is make Supper, BUT, I can't have my babygirl cooking. Maybe when she turns 4 we'll give it a whirl. :-)
After going over a list of what I had on hand, because I was NOT going to go to the grocery store and fight the after work crowds, I decided to make Chili. I didn't have ground beef on hand, but I did have ground turkey. Healthier, so that's an added bonus. I don't always make this recipe the same way. It depends on my mood, so, another plus is that this recipe is versatility. Add what you want. Work with what you have on hand.
Ingredients
1 lb. Ground Turkey, cooked
Onion (however much you want), chopped ( I didn't have an onion, so I used my dried, minced onion)
1 Red Pepper, chopped
1 Green Pepper, chopped
Olive Oil
Chili Powder (at least 4 Tbsp)
Ground Cayenne Pepper (I add between 1/2 - 1 tsp, but add as much or as little as you like, or can handle)
Mrs. Dash, Southwest Chipotle (I use 2 - 3 tsp.)
Mrs. Dash, Fiesta Lime ( 1 - 2 tsp.)
1 28oz can crushed tomatoes
1 can Chile Style diced tomatoes (about 15 oz size can)
1 can Red Kidney Beans
1 can Diced tomatoes w/onion, celery & green pepper
(again, use what you have on hand, mix it up. All these can are about 15 oz each)

Directions
In a small frying pan, brown your ground turkey. While that is cooking, add some olive oil to the saucepan you will be cooking your chili in, and add your chopped peppers and onions. While the veggies are cooking, I like to add my spices. Chili powder, Cayenne, Mrs. Dash combos. Add what you like. Maybe a little Sage, or Pepper. Whatever suits your taste. Have FUN with it. :-)
Once the turkey is browned, I add it to my seasoned veggies, and mix it up, usually adding more of my spices.
Now it's time to dump in your canned tomoatoes. Crushed, diced, seasoned or not, add them in. Then, add your Kidney beans. I drain off the excess liquid before adding them, but do what you prefer. Once it's all mixed up, and you're satisfied with the amount of seasonings added, bring it to a boil, then cover and turn the heat down to low, and let it simmer away for about a half hour. Stir it once in awhile, but you don't need to babysit it, hovering constantly. :-)
Okay, now while that's simmering, lets move on to the cornbread. YUMMY. It's my Mom's recipe that she has had forever (okay, it seems like forever to me). It is QUICK and EASY. Here it is:
Ingredients
1 cup coarse yellow cornmeal
1/2 cup flour (I changed this, and use the half/half stuff, white whole wheat flour)
1 Tbsp. baking powder
1/2 Tbsp. salt
1/4 c. sugar
1 cup milk
1 extra large egg
Directions
Preheat your oven to 450 degrees. Grease a loaf pan (I use a 9 x 5, but an 8 x 4 would do just fine). Mix all the ingredients together in a bowl, pour into the greased loaf pan, and bake for 18 to 20 minutes. Remove from the oven and let it sit for about 10 minutes before serving.
YAY! See how easy that was? Now, everything is ready, and Supper is served. Hope you enjoy it as much as we did!
~ Thanks for stopping by! ~
Jaime
After going over a list of what I had on hand, because I was NOT going to go to the grocery store and fight the after work crowds, I decided to make Chili. I didn't have ground beef on hand, but I did have ground turkey. Healthier, so that's an added bonus. I don't always make this recipe the same way. It depends on my mood, so, another plus is that this recipe is versatility. Add what you want. Work with what you have on hand.
Ingredients
1 lb. Ground Turkey, cooked
Onion (however much you want), chopped ( I didn't have an onion, so I used my dried, minced onion)
1 Red Pepper, chopped
1 Green Pepper, chopped
Olive Oil
Chili Powder (at least 4 Tbsp)
Ground Cayenne Pepper (I add between 1/2 - 1 tsp, but add as much or as little as you like, or can handle)
Mrs. Dash, Southwest Chipotle (I use 2 - 3 tsp.)
Mrs. Dash, Fiesta Lime ( 1 - 2 tsp.)
1 28oz can crushed tomatoes
1 can Chile Style diced tomatoes (about 15 oz size can)
1 can Red Kidney Beans
1 can Diced tomatoes w/onion, celery & green pepper
(again, use what you have on hand, mix it up. All these can are about 15 oz each)

Directions
In a small frying pan, brown your ground turkey. While that is cooking, add some olive oil to the saucepan you will be cooking your chili in, and add your chopped peppers and onions. While the veggies are cooking, I like to add my spices. Chili powder, Cayenne, Mrs. Dash combos. Add what you like. Maybe a little Sage, or Pepper. Whatever suits your taste. Have FUN with it. :-)
Once the turkey is browned, I add it to my seasoned veggies, and mix it up, usually adding more of my spices.
 |
| Veggies, ground turkey and seasonings all mixed up. Yum. |
Okay, now while that's simmering, lets move on to the cornbread. YUMMY. It's my Mom's recipe that she has had forever (okay, it seems like forever to me). It is QUICK and EASY. Here it is:
Ingredients
1 cup coarse yellow cornmeal
1/2 cup flour (I changed this, and use the half/half stuff, white whole wheat flour)
1 Tbsp. baking powder
1/2 Tbsp. salt
1/4 c. sugar
1 cup milk
1 extra large egg
Directions
Preheat your oven to 450 degrees. Grease a loaf pan (I use a 9 x 5, but an 8 x 4 would do just fine). Mix all the ingredients together in a bowl, pour into the greased loaf pan, and bake for 18 to 20 minutes. Remove from the oven and let it sit for about 10 minutes before serving.
YAY! See how easy that was? Now, everything is ready, and Supper is served. Hope you enjoy it as much as we did!
 |
| Mom's Cornbread |
 |
| Turkey Chili, ready to eat |
Jaime
Sunday, March 13, 2011
Chocolate Peanut Butter Banana Bread (Recipe)
I just made this bread for the first time, and it turned out great! It's a recipe that I had written down, but never tried it. I added a few things to it in an attempt to make my Fiancee like banana bread. : -) Success!! Hope you enjoy it as much as we did.

Ingredients:
1 1/2 cup unbleached white whole wheat flour (or you can do 3/4 cup white and 3/4 cup whole wheat)
2/3 cup brown sugar
1 1/2 tsp. baking powder
1/4 tsp. baking soda
3/4 cup rolled oats
2 Tbsp. Hershey's cocoa, Special Dark
1 tsp. cinnamon (rounded)
2 to 3 smooshed up bananas
1/3 cup milk with 1 1/2 tsp vinegar added to it (or 1/3 cup buttermilk)
1/4 cup vegetable or canola oil
1 tsp. vanilla
2 eggs, beaten
1 cup peanut butter chips (or another flavor chip of your choice)
Cooking Spray
Directions:
Preheat your oven to 350 degrees, and prepare 1 bread loaf pan (the pan I used was 9" x 5", but 8" x 4" would work as well) with the cooking spray. Combine all dry ingredients, except the chips, in a large bowl. Combine the smooshed up bananas, milk, oil, vanilla and eggs in a smaller bowl. Add the wet ingredients to the dry ingredients, and stir just until combined. Add the peanut butter chips, and stir until incorporated into the batter.
Put batter into your prepared loaf pan, and bake for 55-60 minutes, or until a toothpick (I use a butter knife) inserted in the center of the loaf comes out clean. Side note: You're still going to have melted peanut butter chips stuck to your knife, so don't use that as a guideline for the bread being done. :)
Cool on a wire rack, in the pan, for 10-15 minutes. Remove bread from pan and cool completely (but feel free to enjoy while it is warm, because it is DELICIOUS that way!
Please let me know if you try a different flavor chip, and how it turns out. Enjoy!
~ Thanks for stopping by! ~
Jaime


Ingredients:
1 1/2 cup unbleached white whole wheat flour (or you can do 3/4 cup white and 3/4 cup whole wheat)
2/3 cup brown sugar
1 1/2 tsp. baking powder
1/4 tsp. baking soda
3/4 cup rolled oats
2 Tbsp. Hershey's cocoa, Special Dark
1 tsp. cinnamon (rounded)
2 to 3 smooshed up bananas
1/3 cup milk with 1 1/2 tsp vinegar added to it (or 1/3 cup buttermilk)
1/4 cup vegetable or canola oil
1 tsp. vanilla
2 eggs, beaten
1 cup peanut butter chips (or another flavor chip of your choice)
Cooking Spray
Directions:
Preheat your oven to 350 degrees, and prepare 1 bread loaf pan (the pan I used was 9" x 5", but 8" x 4" would work as well) with the cooking spray. Combine all dry ingredients, except the chips, in a large bowl. Combine the smooshed up bananas, milk, oil, vanilla and eggs in a smaller bowl. Add the wet ingredients to the dry ingredients, and stir just until combined. Add the peanut butter chips, and stir until incorporated into the batter.
 |
| YUMMY :) |
Put batter into your prepared loaf pan, and bake for 55-60 minutes, or until a toothpick (I use a butter knife) inserted in the center of the loaf comes out clean. Side note: You're still going to have melted peanut butter chips stuck to your knife, so don't use that as a guideline for the bread being done. :)
Cool on a wire rack, in the pan, for 10-15 minutes. Remove bread from pan and cool completely (but feel free to enjoy while it is warm, because it is DELICIOUS that way!
 |
| All done and ready to be eaten. |
 |
| Sooooo good. |
~ Thanks for stopping by! ~
Jaime
Saturday, March 12, 2011
Tutorial: Coffee Sleeves
Okay, time for another tutorial! Still getting the hang of doing these, and I hope I don't confuse you with my explanations.... I prefer to think that I'm being helpful. :-)
Lately, on my way to work, I have been stopping at the 7-11 on the corner, for a coffee (because the 2 cups I have before I leave the house is apparently not enough!). They have the cardboard sleeves to put on the cup so you don't burn your hand (in theory). Even with that sleeve on there, it's pretty hot, not to mention, wasteful, so I decided to try and make my own coffee sleeve. I've also been thinking of getting one of these travel mugs, so I can just make an extra cup at the house. Saves money, and I won't be buying another paper cup to throw in the trash. Anyway.... this is what I came up with:
Materials Needed
Cotton Fabric
Flannel (or coordinating cotton fabric)
Batting
Scissors
A cardboard sleeve to make your pattern from
Mark-B-Gone Marking Pen (or something similar)
Velcro
Sewing Machine, Thread, Pins
Iron


After making and cutting out your pattern, iron your fabric and use your marking pen to trace the pattern onto your fabric.

~ Thanks for stopping by! ~
Jaime
Lately, on my way to work, I have been stopping at the 7-11 on the corner, for a coffee (because the 2 cups I have before I leave the house is apparently not enough!). They have the cardboard sleeves to put on the cup so you don't burn your hand (in theory). Even with that sleeve on there, it's pretty hot, not to mention, wasteful, so I decided to try and make my own coffee sleeve. I've also been thinking of getting one of these travel mugs, so I can just make an extra cup at the house. Saves money, and I won't be buying another paper cup to throw in the trash. Anyway.... this is what I came up with:
Materials Needed
Cotton Fabric
Flannel (or coordinating cotton fabric)
Batting
Scissors
A cardboard sleeve to make your pattern from
Mark-B-Gone Marking Pen (or something similar)
Velcro
Sewing Machine, Thread, Pins
Iron


 |
| Take your cardboard sleeve and make your pattern... I made mine a bit larger, so it could be adjustable. :-) |
 |
| Cut-out Pattern |
After making and cutting out your pattern, iron your fabric and use your marking pen to trace the pattern onto your fabric.
 |
| The traced pattern is clearly visible on the flannel. I had to trace the pattern on the wrong side of my cotton fabric so I could see it. :-) |
After cutting out your cotton fabric, flannel (or coordinating cotton fabric), and batting, line them up in this order: cotton fabric right side facing you, flannel (if using coordinating cotton fabric with a pattern, place is wrong side up, so the right sides of both pieces are facing each other), and batting on top.
 |
| Patterned fabric facing right side up, flannel, and batting |
Next, pin all 3 layers together, and using your sewing machine, stitch around the edge, being sure to backstitch at the beginning and end, leaving at least a 2 inch opening at the bottom, curved edge.
 |
Layers pinned together, ready to be sewn.   |
Clip your corners, being careful not to cut into your stitches. Turn right side out, making sure to turn it out so the 2 outside layers are showing, and your batting is not. :-)
 |
| I am a visual person, so that's why I'm posting so many photos....Pictured above, making sure I'm separating the 2 outside fabrics before turning right side out. |
After turning right side out, and making sure the corners are completely turned right side out (may need to give them a few extra pokes to get them there), iron your sleeve, and be sure to turn the opening under, as it will be closed when you topstitch around the edges.
Next step is to topstitch around the edges of your sleeve. I did a single line, but you could do a zig-zag, or whatever stitch you prefer. Make sure the topstitching closes your opening on the bottom curved edge, and backstitch at the beginning and end.
 |
| Topstitching |
 |
| Topstitching done on both sleeves |
Now it's time to add the velcro. I put the loopy, more itchy/pokey side of the velcro (sorry, I don't know how else to describe it!), on the right side of the sleeve, as pictured above. Cut a piece long enought to go the entire length of that edge, and stitch around the edges of the velcro, being sure to backstitch at the beginning and end.
 |
Used blue velcro on my Autism coffee sleeve. Love how it looks. :-) |
Now it's time to add the "softer" velcro. It needs to go on the opposite side AND end from the piece you just attached. You can see in the photo above, the stitching from the velcro attached on the side facing down. I added 2 pieces of this velcro, so there is room for adjustment, depending on the size of the cup you are using it for. Stitch around both pieces, with the pieces just barely overlapping. Be sure to backstitch at the begining and end.
 |
2 pieces of blue velcro added to the Autism coffee sleeve. |
YAY! You've finished your coffee sleeve. Now it's time to brew a yummy cup of coffee, and put it to use. I hope, again, that I haven't confused you. If you have any questions about this tutorial, please don't hesitate to ask!
 |
| :-) |
 |
| Autism sleeve on my 7-11 coffee cup. :-) |

~ Thanks for stopping by! ~
Jaime
Friday, March 11, 2011
Something Else That's Cooking This Weekend
My friend Belva, over at Mainely Mug Ups, posted her Chocolate Cake recipe today, and I will be trying it out this weekend. If it is half as delicious as it sounds, well, it will be quite a treat! Go check out her Blog. She is writing her first book, and is having one of her poems, The Maine Lobsterman, published as well. Reading her posts makes me a little homesick (her daughter and I are the same age, and we lived across the street from each other growing up). I'm looking forward to reading her book, once it's published. Let me know if you try her Chocolate Cake, or any of her other yummy recipes. :-)
Mainely Mug Ups: On The Menu At The Mug Up Cafe
~ Thanks for stopping by ~
Jaime
Mainely Mug Ups: On The Menu At The Mug Up Cafe
~ Thanks for stopping by ~
Jaime
Something To Look Forward To (I Hope!)
It's me again (who else would it be??). I will be posting a few things over the weekend. I have a tutorial for a coffee sleeve in the works, and a recipe for banana bread. If anything else gets posted, well then, it will be a surprise to you AND me. Hope y'all are having a wonderful week! Do a Happy Dance. It's Friday!! :-)
~Thanks for stopping by ~
Jaime
~Thanks for stopping by ~
Jaime
Monday, March 7, 2011
Tutorial: Cabochons
It's been awhile since I've posted anything....life gets in the way sometimes! Work, housework, time with the kiddos, and of course, crafting time! I opt to forego a few hours of sleep most days to satisfy my need for making something.Crazy? Maybe. Fun? Absolutely! :-)
Okay, now for the good stuff. Cabochons. I started seeing them everywhere....blogs, etsy....they seem to be quite popular. I, of course, just *had* to try and make them. I looked for a tutorial, and had no luck in finding one, soooooo, I decided to wing it, and this is what I came up with:
Materials needed:
Resin & Hardener - I used Easy Cast Clear Casting Epoxy (can be found here)
Mixing/Measuring Cups
Something to Stir with - I used small craft sticks...kind of look like toothpicks, but longer and wider on one end
Molds - I got mine on Etsy
Color Pigment - found here
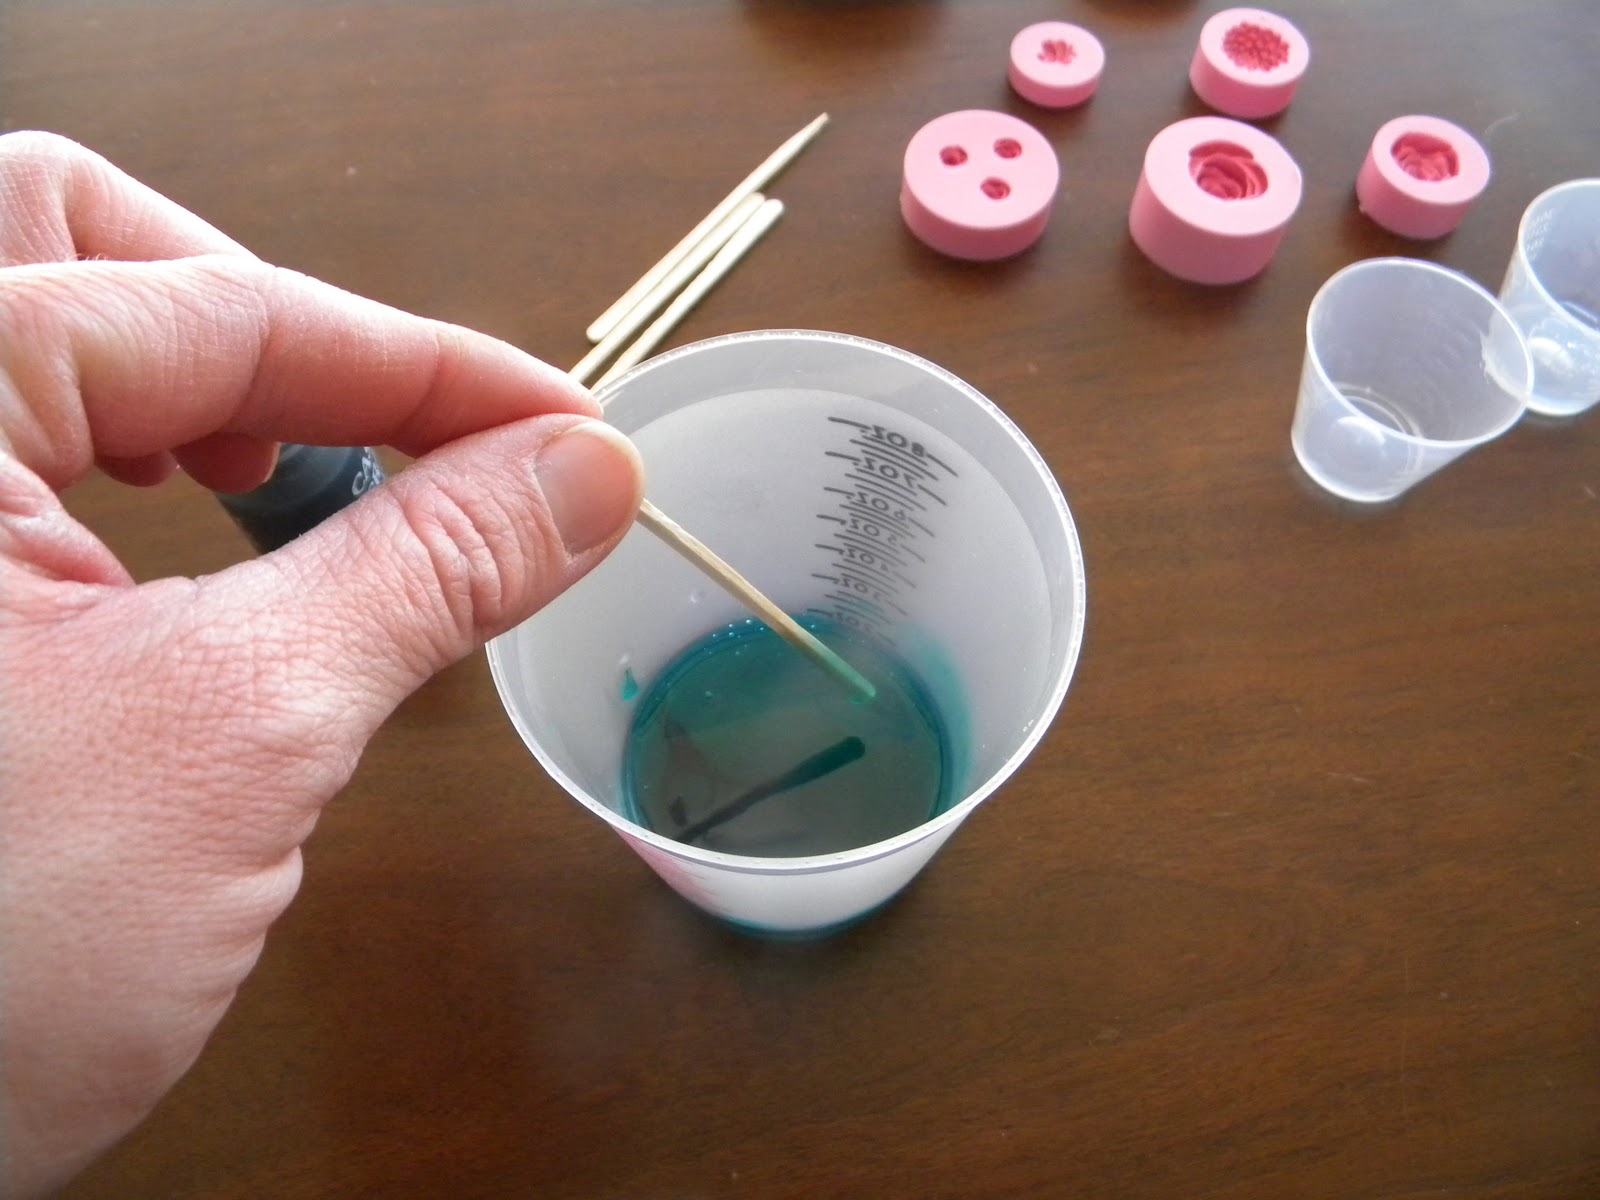
Now that you have your materials gathered, let the fun begin! The Clear Casting Epoxy is an easy 1 to 1 ratio for mixing.
Mix your resin & hardener, and then add your color pigment. I've found that if you mix it nice and slow, you don't have to deal with as many air bubbles after you pour it into your molds.


Once it is all mixed up (be sure and scrape the bottom to make sure it is blended well), pour it into your molds. Keep a piece of paper towel handy to wipe up any spills.


There is a lot you can do with your cabochons. So far I've made pendants and rings. The possibilities are numerous. Have fun with it!!


~ Thanks for stopping by! ~
Jaime
Okay, now for the good stuff. Cabochons. I started seeing them everywhere....blogs, etsy....they seem to be quite popular. I, of course, just *had* to try and make them. I looked for a tutorial, and had no luck in finding one, soooooo, I decided to wing it, and this is what I came up with:
Materials needed:
Resin & Hardener - I used Easy Cast Clear Casting Epoxy (can be found here)
Mixing/Measuring Cups
Something to Stir with - I used small craft sticks...kind of look like toothpicks, but longer and wider on one end
Molds - I got mine on Etsy
Color Pigment - found here
Now that you have your materials gathered, let the fun begin! The Clear Casting Epoxy is an easy 1 to 1 ratio for mixing.
 |
| Easy Cast is a low odor resin, but it's still nice to have some fresh air while doing this, if the option is available. |


Once it is all mixed up (be sure and scrape the bottom to make sure it is blended well), pour it into your molds. Keep a piece of paper towel handy to wipe up any spills.

 |
| Use the small end of the stirrer to remove any air bubbles that form on the surface. |
Now you can step back and admire your handiwork. Use the paper towel to wipe out any excess resin mix from your cup so it can be re-used. Wait at least 12 hours to make sure it has time to set. I must admit, it is very exciting when you lightly touch it to check, and it's completely dry. Popping them out of the molds is so satisfying!


There is a lot you can do with your cabochons. So far I've made pendants and rings. The possibilities are numerous. Have fun with it!!


~ Thanks for stopping by! ~
Jaime
Come join in the fun at these fabulous parties!!
Subscribe to:
Comments (Atom)